RU
RU
Quick start in Dolphin {Server}
Welcome! Thank you for choosing our Facebook account automation product. This software continues to develop and is supplemented with new features thanks to your feedback. If you haven't heard about it yet, we suggest fixing this mistake! The first step, in this case, is to familiarize yourself with the quick start in Dolphin{server}. Let's start with registration :)
Account registration
To join the movement with Dolphin{server} you need to do a simple action - registration. To do this, you need to:
- Go to the site https://panel.dolphin.ru.com/
- Press the “Register” button
- Enter your mail, password, repeat it, indicate your Telegram and promotional code, if you have one. Optionally, you can specify how you work - solo or in a team. This does not affect the work, it is collected for statistics.
- After entering the data, click “Register” and wait for completion. We recommend that you save the login information in the browser so that you do not fill it out every time.
- If the system does not allow you to register - try another mail or contact our technical support department - we will stop and solve the problem in a matter of minutes.

When the registration is completed, you will again need to enter your email and password to enter and in your personal account the system will prompt you to complete the installation. Let's take a closer look at this stage.

Selecting a server to install
All new users will receive a Trial tariff plan immediately after installing Dolphin{server}. Since this is not a desktop application, but a server one, it must be installed on a VDS (VPS). Before installing, select the provider option that suits you:
- Timeweb (only Europe, servers in the Russian Federation are suitable for work, but not for everyone + there is an auto-installation of Dolphin)
- Friendhosting (popular recently)
- Linode (if you have a European payment)
- Hetzner (for large loads)
- your own option.
Each of these providers has different capabilities, but to install Dolphin{server}, you just need to select a server with the following parameters:
- Operating system - Debian 10 Linux (only this system)
- RAM - from 2 GB
- Number of processor cores - from 1 core
- Memory HDD/SSD - from 25 GB
- Server location - any country in Europe or neighboring countries (except Russia itself)
- No restrictions on external and outgoing connections (so that the Dolphin{server} license can be updated correctly).
If it is difficult for you to choose the RAM and CPU parameters right away, do not worry - take the minimum one (as indicated in the checklist) and, if necessary, you can improve the configuration through your server provider without losing data.
Having decided on the parameters, start creating the server and wait for it to complete. If you choose Timeweb, then you just need to select “Marketplace” - “Dolphin” when creating the server and Dolphin{server} will be installed automatically. In this case, you can skip the installation step and go straight to “Creating a User”.
After purchasing a server, you must have root access to purchase. Usually sellers send it to your mail, which you specified when registering on the seller's service. It looks something like this: IP, root, password. You will need this information in the next step.
Installation
The actions performed in this step affect the operation of the server. If you feel that you can't cope - contact our technical support department and we will help you install Dolphin{server} on the server without any problems.
To install Dolphin{server} yourself (if you are not a Timeweb user), you need to connect to the server remotely. The connection is made from your computer. Since clients have different OS, we differentiate this stage for each separately.
Installation via Windows
- Open “Command Prompt” (via “Start” is the fastest)
- Enter the command ssh root@IP address you bought, for example, we have ssh root@193.168.3.107. If you chose friendhosting, then note that they have a non-standard ssh port (22), but 3333. To connect on port 3333, you need to enter the command: ssh root@IP-address -p 3333
- The first time you log in, you will be asked to save a fingerprint. Type yes and press Enter
- Next, the system will ask you to enter a password. Enter the password manually (paste from clipboard doesn't work here). Please note that when you enter you will not see the password, you need to enter it carefully
- After you have connected to the server, you must enter the command: apt update (in order to update the Debian 10 build)
- Next, you just need to paste the command (shift+insert hotkeys ) to install Dolphin{server}
rm -f install.sh && apt install -y wget > /dev/null 2>&1 && wget https://panel.dolphin.ru.com/97384261b8bbf966df16e5ad509922db/install.sh -O install. sh > /dev/null 2>&1 && bash install.sh
- After you get the message “I think it is done :), go to your ip/install.php in any browser. Enter the data from panel.dolphin.ru.com that you received at the “Account Registration” step. Next, proceed to the “Creating a User” section. Installation completed.


Installation via MacOS / Linux
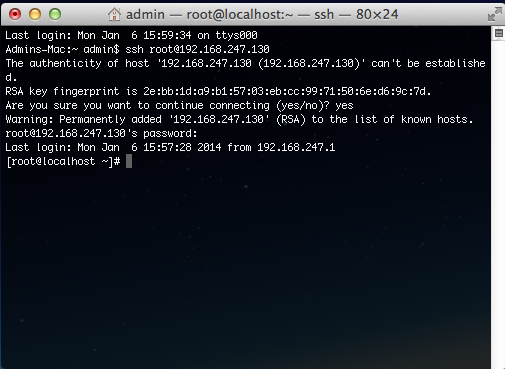
- Open “Terminal”
- Enter the command ssh root@IP-address. If you chose friendhosting, please note that they do not have the standard ssh port (22), but 3333. To connect on port 3333, you need to enter the command: ssh root@IP address -p 3333
- When you first log in, you will be asked to save a fingerprint . Type yes and press Enter
- Next, the system will ask you to enter a password. Enter the password manually (paste from clipboard doesn't work here). Please note that when you enter you will not see the password, you need to enter it carefully
- After you have connected to the server, you must enter the command: apt update (in order to update the Debian 10 build)
- Next, you just need to paste the command (shift+insert hotkeys ) to install Dolphin{server}
rm -f install.sh && apt install -y wget > /dev/null 2>&1 && wget https://panel.dolphin.ru.com/97384261b8bbf966df16e5ad509922db/install.sh -O install. sh > /dev/null 2>&1 && bash install.sh
- After you get the message “I think it is done :), go to your ip/install.php in any browser. Enter the data from panel.dolphin.ru.com that you received at the “Account Registration” step.
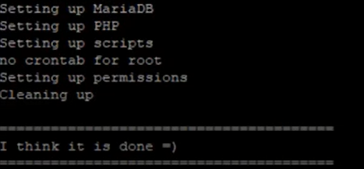

Next, proceed to the “Creating a User” section. Installation completed.

Creating a user
Before you can start working with Dolphin{server}, you need to create a user. Please note that the first created user is a user with “Administrator” rights. Treat the creation of this user as carefully as possible. Enter the information that Dolphin{server} requests and keep it in a safe place. After registering on the server, log in to the server and proceed with the initial setup.
Initial setup
In order to immediately begin to interact correctly with future FB accounts in Dolphin{server}, we recommend that you go through the following checklist:
- Go to the menu on the left to “Settings”.
- Select "Basic". Disable the “experimental feature”, if you don’t want to share server bugs, disable the “Send error data to developers” mode. If you plan to work independently on the server, disable "Use my settings for everyone". Leave this option enabled if you will have many employees (more than 2).
- Select “Settings” again, but already “Update FB data”.
- Set the update time for these accounts based on the fact that it takes about 1.5 minutes for a full update for 1 FB social account (if it manages 1-2 advertising accounts). If the social network has 10-20-100500 ad accounts under management, we recommend contacting support to clarify the details regarding this time. Those. example: if you have 100 accounts with 1-2 ad accounts on 5 mobile proxies (evenly), then the update time will be 30 minutes. If you have 1 proxy - 1 account, then you can set the time to 15 minutes. This is the minimum. Less than 15 minutes is not recommended. FB does not update statistics more often than once every 15 minutes.
- Turn on “Auto publish of fan pages” if your publication on the FP often crashes. Disable this option and the FP will never be automatically published.Turn on "Auto review of rejected ads" if you often fail to pass the moderation on the first try. Disable this option if you control the submission for re-moderation yourself.
- In the “Mobile proxies” item, enable “Change IP when requesting from UI” if your proxy has a link to change IP. If it is not present and the proxies are static, disable this option. Waiting time before changing - set at least 30 seconds. Waiting time for a new IP - set at least 30 seconds. If you are sure that 30 seconds is a lot, you can set 10 seconds for each parameter, but not less, otherwise updating the data will be complicated by the failure of the proxy.
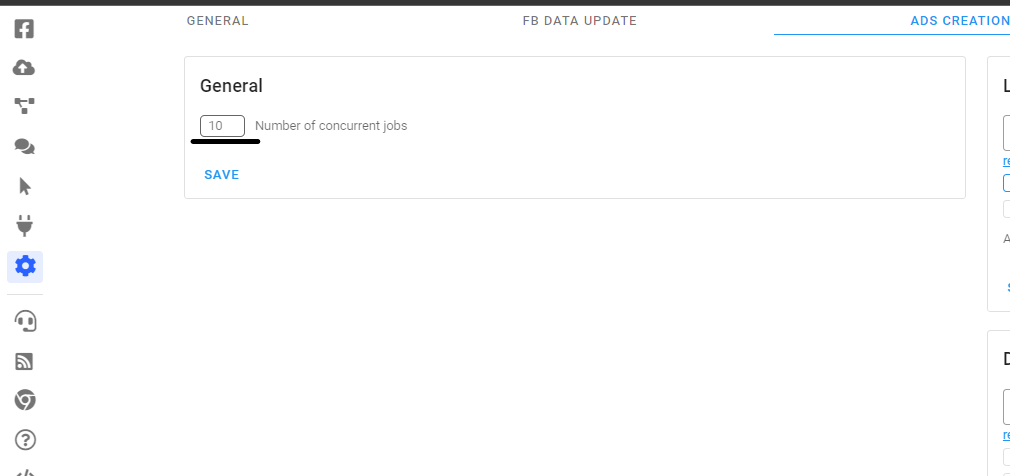
- Next, select the “Ads Creation” tab right there in the “Settings”.
- We recommend setting the number of simultaneous tasks to no more than 10 for your server to work correctly. If you have a very powerful server (from 8 GB of RAM and from 4 cores), you can start with the number of 20 simultaneous tasks. This number affects the number of ad accounts that can be uploaded at the same time in the ad upload queue.
- Set the link and deep link parameters in advance if you know exactly what parameters you will need and you want to upload ads immediately with tags so as not to prescribe them when uploading. The available options are listed below the “Link/deeplink Options'' field and are activated by clicking. If you want the link/deep link parameters to be checked by spy services, leave the “Add parameter” parameter in the “Link url” position. If vice versa, then in the “URL params'' position.
- We recommend setting the number of simultaneous tasks to no more than 10 for your server to work correctly. If you have a very powerful server (from 8 GB of RAM and from 4 cores), you can start with the number of 20 simultaneous tasks. This number affects the number of ad accounts that can be uploaded at the same time in the ad upload queue.
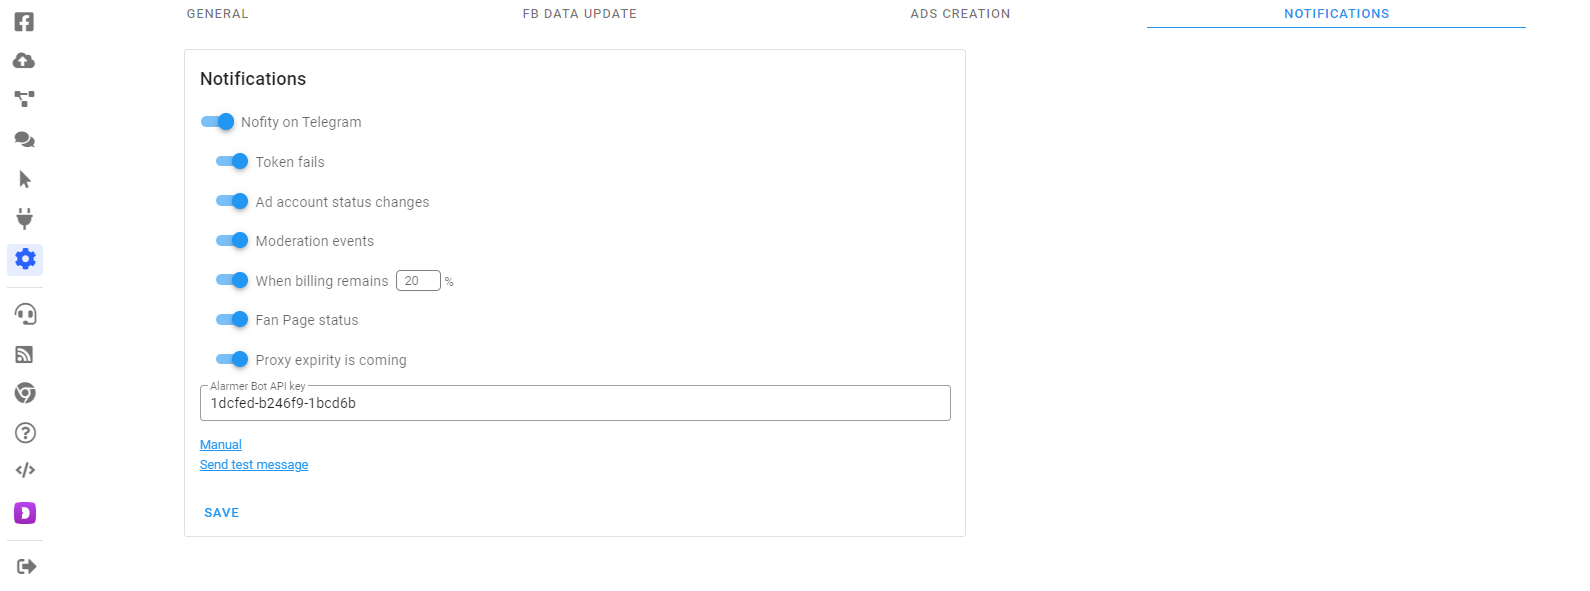
- Add the @alarmer_bot bot to the telegram, send the /start message to the bot, the bot will send you a message with the API key. Paste it into Dolphin {Server} settings. These are the steps to set up the bot itself. “Notifications” tab allows you to configure the receipt of notifications in the TG. Select the parameters you need in the active position, follow the instructions for connecting the bot, and the bot will show you all the selected events.
- Cost export is easy to set up. If you need it :) You can skip this step if you don't use trackers. Here is the instruction for Keitaro https://docs.dolphin.ru.com/view/5, for Binom https://docs.dolphin.ru.com/view/8
- Go to the “Comments” tab in the menu on the left. Choose what to do with the comments and set the time for the handler. Please note that betting less than 15 minutes is not worth it.
This completes the initial setup. Please note that after installation, you may have a message at the bottom of the Dolphin{server} panel "Your server is overloaded". This is fine. After 1-2 hours, this message will disappear.
Adding accounts, accepting rules, creating fan-page, linking card, creating bundle
We figured out the settings and installation :) Now let's move on to the most important thing - adding accounts and preparing them for the first ad upload.checklist looks like this:
- Adding an account(s). Before adding them, you need to have them already available (buy, farm, register - you do everything yourself, we do not provide accounts). You can add one account or several at once.
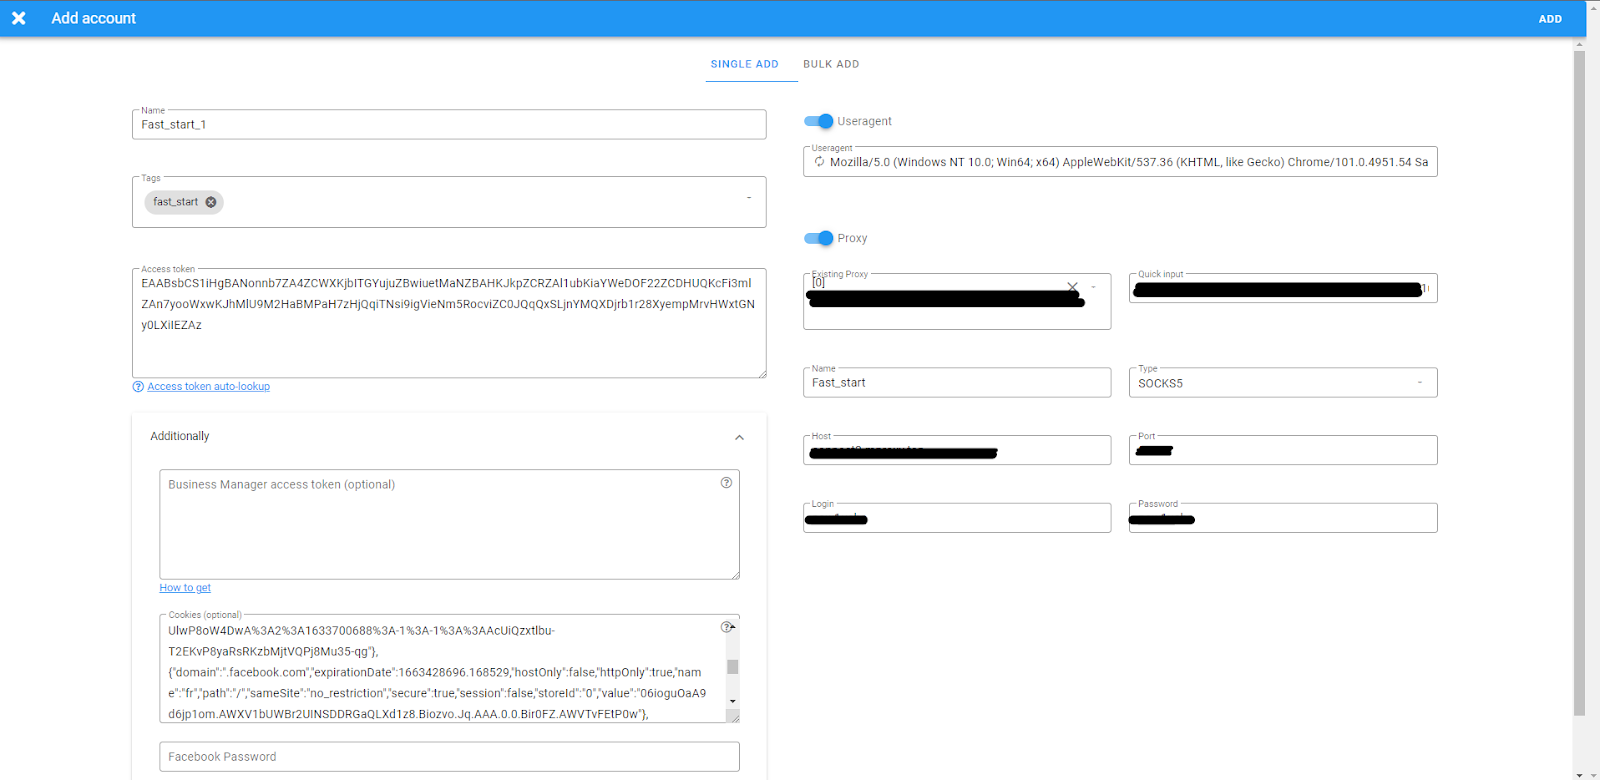
- Add one: Section “ADS Manager” - Accounts - “Add account”. In the window that opens, enter the Name, token, proxy, cookies (in the “Advanced” section). The account token looks like: EAAbskjfkafj…., any proxies are supported, except 911.
- Add several: Section “ADS Manager” - Accounts - “Add account” - “Bulk add”. Use the format hint. This method is relevant if you immediately add 10-100-1000 accounts. Most popular format: Name :: access_token :: :: http://host:port:login:password:name :: [{json cookie}] :: account password.
- Add via extension. Here is an introductory video: https://www.youtube.com/watch?v=fVscTCy0GNg
- Check that the proxies you added along with your account are working.
- Add one: Section “ADS Manager” - Accounts - “Add account”. In the window that opens, enter the Name, token, proxy, cookies (in the “Advanced” section). The account token looks like: EAAbskjfkafj…., any proxies are supported, except 911.
- After you have added your accounts to Dolphin, you must accept the rules of the non-discrimination policy for them. This is very simple to do: select the accounts with checkmarks, click the “three dots” in the top menu, then select the “Accept rules” item. Waiting for completion. Even if you have accepted the rules in the browser, it is better to repeat this step to be sure.
- To load advertising accounts, select the accounts with checkmarks, click the “Update” button at the top and wait for the completion. This will allow uploading advertising accounts to Dolphin with up-to-date information.
If the download failed - select "three dots" - "Init ad account". This will not create a new account, but will give a request to FB to load accounts a little differently than by updating the data.
- If your accounts are new, it is logical to assume that they do not have FP. To create a FP, you need to: select accounts with checkmarks, click on the “three dots” in the top menu, then select the “Create FP” item. You can generate titles for all FPs at once - the update button in the field above the "Category for all pages" drop-down list. You can also immediately select a category, turn off notifications, and upload avatars. When everything is ready to be created, click on “Create” and wait for the result.
- After creating the FP, you need to link the cards to the advertising ad accounts. It's very simple. Select the accounts whose accounts need to be processed using the checkboxes, go to the “Accounts” tab. Select the ad accounts you need, then “Three dots” and “Link a card”. In this window, enter a card or list of cards in the following format:
1111222233334444;01/21;888;CARDHOLDER NAME;ZIP;VAT ID.


Parameters CARDHOLDER NAME;ZIP;VAT ID are optional and not all can be entered. The main thing is to follow the sequence. ZIP for American maps and can have 5 digits. VAT ID is a TIN, and has 12 digits.
This menu also contains the parameters of the account currency, time zone, country of the account and the possibility of setting the card as the main one immediately on the account. After entering the data, click "Continue" and you will be taken to the "Data Check".

Here it is very important to check that the card(s) have been correctly read(s). Pay attention to the sliders “Parallel execution” and “Pause between ad accounts”. This only works if you knit cards to ad accounts from different accounts with different proxies. If the ad accounts are within the same account, this functionality does not matter. Also, if you have, for example, 10 cards, and 100 ad accounts to bind, you can distribute the cards (there are two choices on the left). If sequential, then 10 cards will be tied in turn 10 times. The 1st card will be on 1, 11, 21, 31, 41…etc. ad accounts, the 2nd card will be for 2, 12, 22, etc. If every N ad accounts, then the 1st card will be tied to N ad accounts, the 2nd card will be tied to the next N ad accounts. For example, there are 100 ad accounts in total, N is set to 12. The system will try to bind the 1st card to the first 12 ad accounts, the 2nd card to the ad accounts from the 13th to the 25th, etc. After selecting the desired data, click "Attach".
- When the cards are tied, there is nothing left but to create a bunch. This is available only on the Pro plan, this item is not relevant on the Base tariff. But there is so much functionality on the Base tariff that you will have all the traffic analytics in one window :) You can find out more at the link: https://dolphin.ru.com/ru/#tariffs
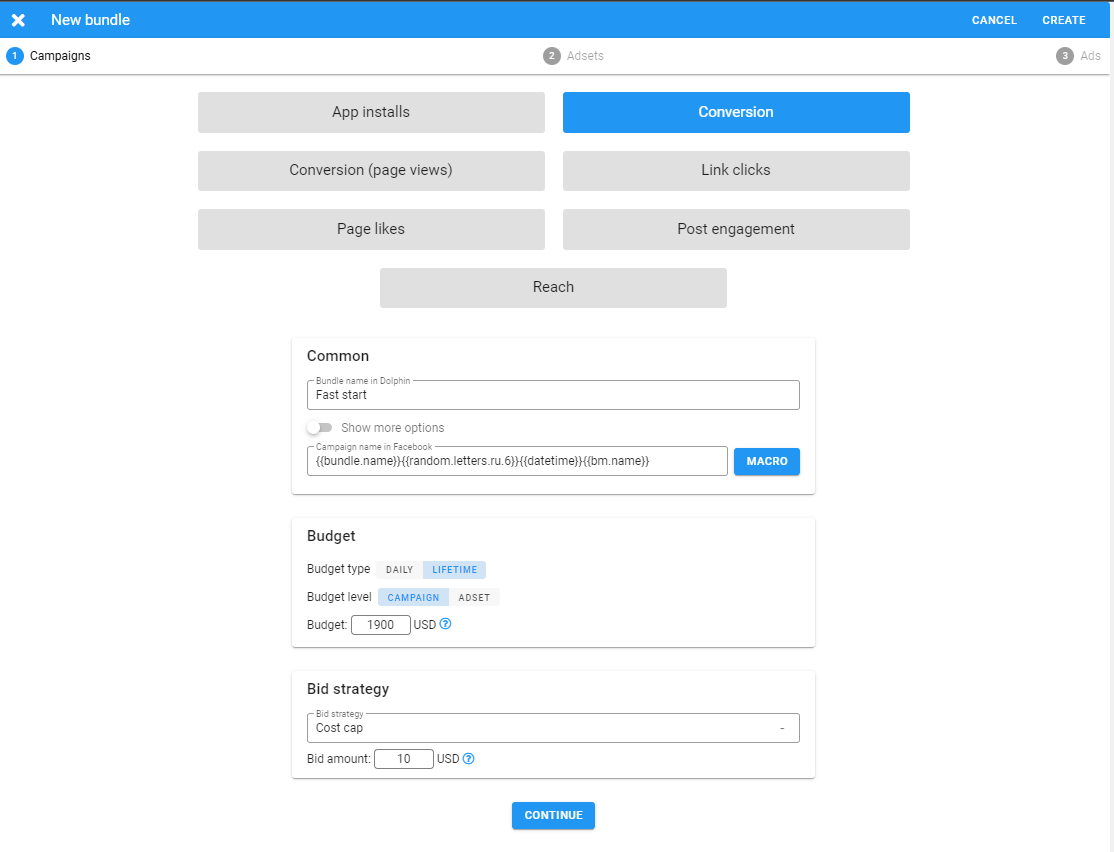
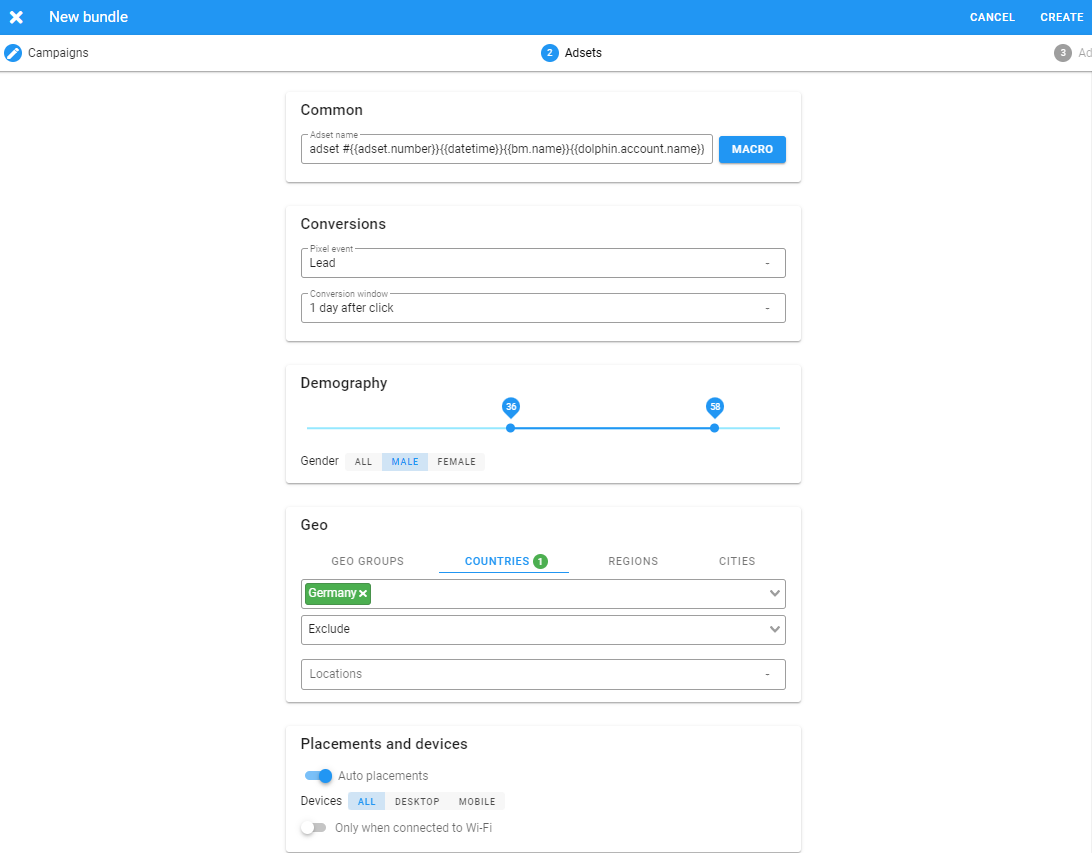
To create a bundle in your Dolphin{server} you need to do the following: select “Create ads” in the menu on the left, click “Create a bundle”, select the target of the bundle. Add information in the form of a link name, name macros (for naming), set a budget and choose a bidding strategy.
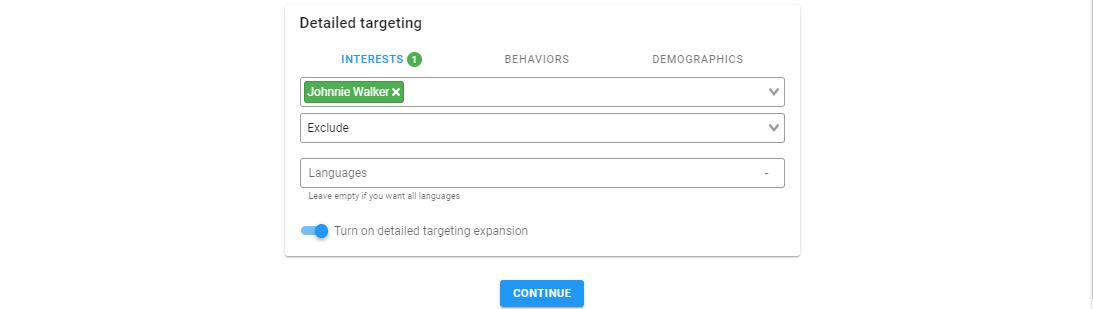
Add adset settings (name, name macros, pixel event (if conversions), app event (if installs), GEO, age, placements, devices, interests, behavior, demographics. The last 3 points are as you wish.
The final step is to go to the "Ads" setting. There you need to specify the Title, name macros, text, description and call to action. Click "Create" to save the link.

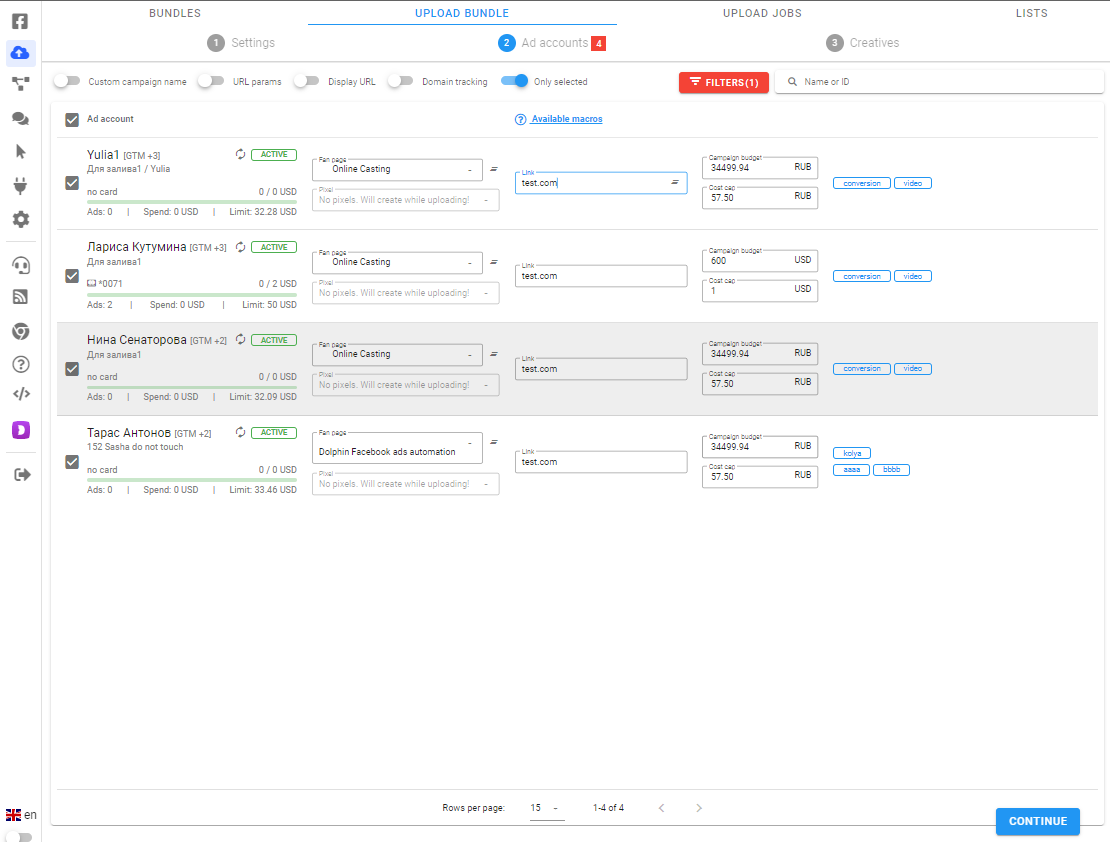
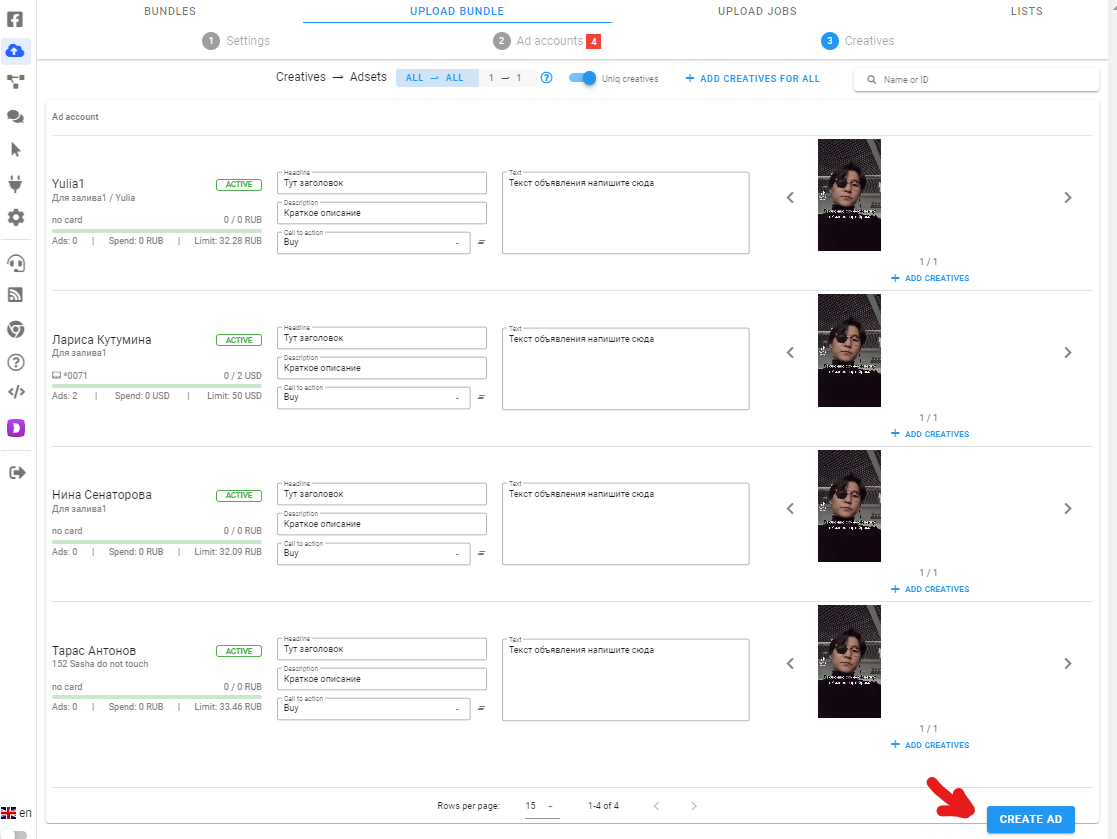
- After the link is created, you can go to the "ADS Manager" section, select the "Accounts" section , select the social networks you need for the bay, then go to “Ad accounts”, there select the ad accounts for the bay (they must be with linked cards and FP, if the bay is for installing applications, then with applications). in the menu above "Create an ad" (cloud logo). You will go to the bay. You will be prompted to select a link and specify additional settings.
After that, you need to enter links / deep links for each account. If the link is the same, there is a button "copy apply to all ad accounts” - to simplify the process of adding. Likewise with the budget. After that click "Continue". Next, we proceed to the stage of Add information and click "Create Ad".

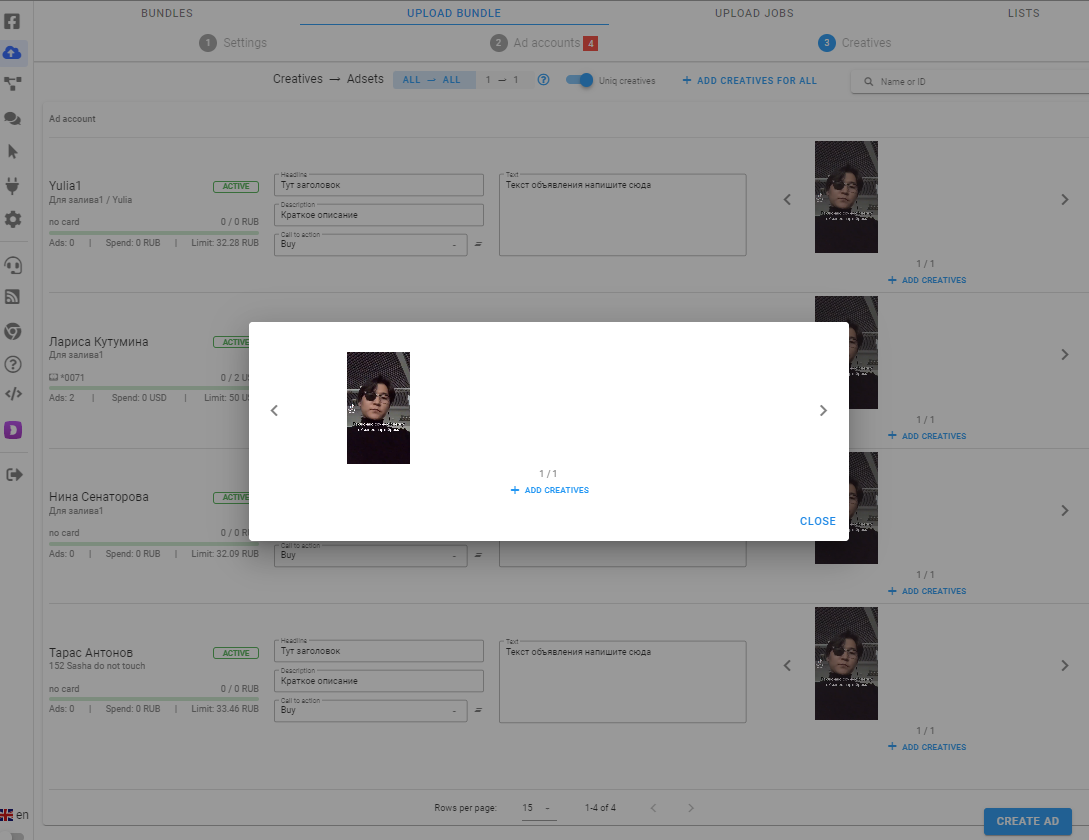
Wait for the completion and the appearance of a green bar. Otherwise, write to our loading creatives and text in conjunction. support, please.
Checking stats
When accounts are flooded, ads are spinning, or you have loaded accounts into the system that already have active ads, it is important to keep your statistics up to date. This can be done manually and automatically. How to do this automatically, we indicated in the “Initial setup” section. To do this manually, you need to:
- Select the elements to update (accounts or ad accounts, ads, etc.)
- Click the “Update data from FB” button. It is located near the dates at the top right
- Wait for the results.
- If the information did not load quickly - do not worry, it may be delayed loading to FB, this is normal practice.
- As a result, you will see a change in the numbers of indicators. Please note that sometimes the date is set incorrectly, specify the current one immediately.
If the statistics are loading for a very long time, contact support, we will figure out all the reasons for the lack of up-to-date statistics.

Creating and adding a team member
Our product is adapted for both solo and team work. If you need to add a user to your Dolphin{server}, follow the instructions below:
- Go to the “Users” tab
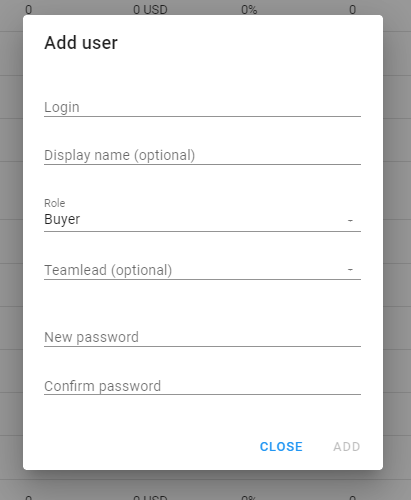
- Click the “Add User” button
- Create a username and display name. Select a role (depending on who you give access to) and create a password. Click "Add". The user is ready.
- After the user is created, give the person the IP of your server and the data that you came up with in the previous step - he will be able to get to the server under his own separate account.
- So that you can transfer accounts to him under management, select the accounts you need and click the “Share” button at the top, and then grant rights to the user by setting the switch to “add rights”, find the created user in the list of users and select which rights you want to grant. Click "Save" and the profiles will appear for the user. At the same time, you see all accounts - both your own and all your users on the server.